Archive for amanda

Fresh Mint Ice Cream

No, this isn’t a cheese post but I figure all dairy is game. If you’re looking for something truly delectable to do with all that mint growing in your garden (or overflowing from your neighbor’s garden) then this is the recipe for you. It’s reprinted at Orangette from The Perfect Scoop (scroll down past the cute shoes) and is a simply perfect flavor for summer. I made it last weekend for a BBQ with my neighbors it is, hands-down, my favorite ice cream I’ve made this summer.

Comments off

Cheese Cloud

My husband sent me a link to wordle.net which makes word clouds from websites — first popularized, I think, by Flickr’s tag clouds. It should come as no surprise what the word cloud for fucheese.com looks like. Really.

Comments off

Fresh French Style Goat Cheese

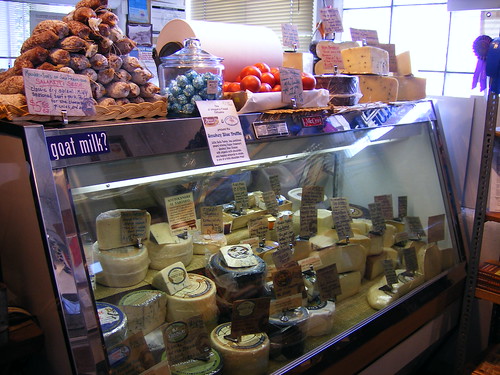
After making the chevre, the goat blanc, and the goat milk gelato, we still had a little over a half gallon of goat milk left (frozen) which was just perfect for the Fresh French Style Goat Cheese recipe that came with my goat cheese kit from Ricki Carrol’s suppy company.

This recipe had all sorts of new things to learn: making a culture, keeping the cheese at a high temperature for a long period of time, and using molds. I made a lot of mistakes.

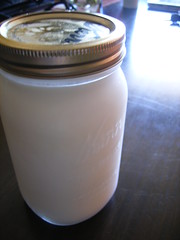
For the culture, I went out and purchased some canning jars and followed the directions. The goat cheese kit comes with a fresh culture packet and directions for how to do this. Basically, you just boil a quart of skim milk and then let it set out and cool. What you should try not to do is permanently warp your husband’s brew kettle and scorch the top of your stove. Which is what might happen if you have a jar sitting on the bottom of a thin metal pot which is also huge because you have no other pot that is large enough to cover the jar. And said kettle hangs over the sides of your burners by a couple inches thus creating a perfectly hot environment, reflecting the heat onto the top of your stove. Oh well, it’s an ugly stove anyway….

After the milk has cooled, you add the culture packet, swirl it around gently and let it sit. I blame the gorgeous weekend combined with family in town that caused me to let it sit a little longer than the 15-24 hours called for… say, 24-48 hours? I cautiously opened it up and it smelled good and looked good so I put that extra 24 hours out of my mind and stuck it in the fridge until I could get around to the cheesemaking.

Fresh Culture

I took a portion of the fresh culture and used it in the very simple French Style Goat Cheese recipe and then moved on to the next step which was to set the cheese out for 24 hours at 86-degrees. Um… what? There was much consulting of friends and asking around for a friend’s yogurt maker (missing) and suggestions to let it set by a heater for 24 hours (husband) and putting it in a warm oven (mine only goes down to 175) and finally I threw up my hands, wrapped it in a blanket while it was still warm and ignored it. It was a warm-ish day, around 80, and I just didn’t know what else I could do.

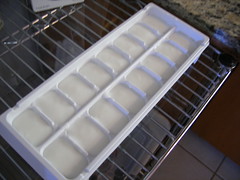
I took the leftover culture and froze it in an ice-cube tray which I had previously sterilized in boiling water. Supposedly, you can use a single ice-cube to make another quart of fresh culture. It’s a self-perpetuating system!

Freezing culture

So, that’s two mistakes of unknown consequences. In any case, I came back a day later and carefully lifted the lid on the pot (my new Favorit stainless steel pot that I got from IKEA for this purpose) and stuck my nose in there. Smelled good! It was still a bit warm and smelled like yummy goat cheese! Hooray!

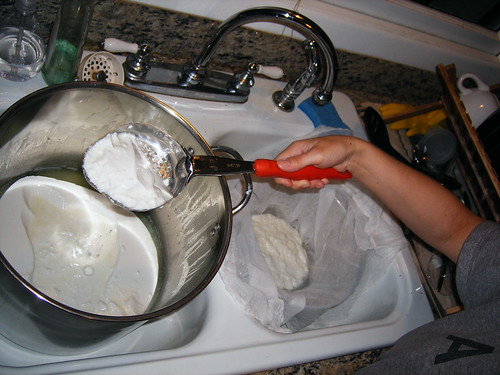
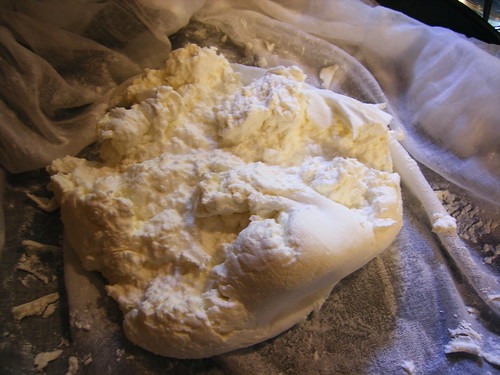
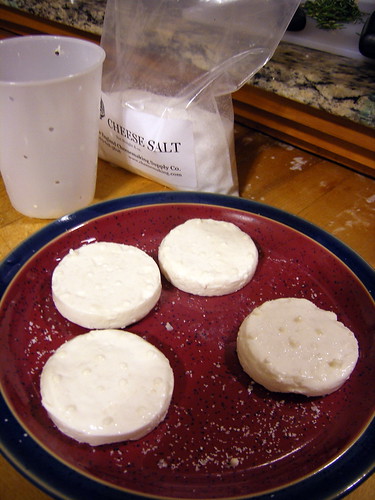
I thought that I would need to hang this cheese before putting it in the molds or at least weighting it in molds to get the whey out but the directions said just to put it in the molds, turning them occasionally. I filled the molds about 3/4 full with the jelly-like curds and whey and set them in a casserole dish and covered it with cloth to keep cats and flies away.

Cheese molds

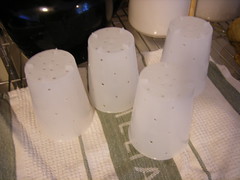
I was so dubious at this point. It just seemed like things would just sit there. It was like a miracle when I lifted the cloth about ten hours later to see about an inch and a half of whey sitting in the dish. I drained that off and left it for a whole day, draining it off once more. Basically, the cheeses just got firmer and firmer and the whey just drained off of its own accord. When all that was left was about a 1/2″ puck of cheese I pulled them carefully out of the molds, sprinkled them with cheese salt (does not come in the kit), wrapped them up in wax paper and put them in the fridge.

Tiny little cheese discs

The most important thing — how did they taste? Well, my husband and I smeared a good helping on some roasted garlic bread which we got from the bakery and it’s pretty good. I think it needs more salt and some herbs. I’m going over today to meet the other cheese ladies (we’re making a press!) and I’ll bring this for spreading over bagels. I think they need a little herbs as well. It’s so hard to tell how much salt to use. Obviously, you don’t want to oversalt but salt really does make the flavor emerge and really makes the cheese. When we did the fromage blanc, it didn’t really achieve a state of total tastiness until we added salt. And the fresh chevre which we made was really amazing once we added the fresh herbs and salt.

There are two notes on rennet with this recipe. One says that if the cheese comes out too rubbery then you are adding too much rennet. The other note says that if too much curd comes out the holes when you put the cheese in the molds then you did not add enough rennet. A little curd came out the holes and the cheese seems a little more on the rubbery side than I thought it would. So, I guess it’s just right? I don’t know. This recipe really brought home how many variables there can be in cheeses and how complicated things can get. On the other hand, with all my little mistakes and uncertainties, these came out pretty well. On a third hand, in the middle of all of this, with family visiting, I managed to make a very delicious blueberry ice-cream which everyone enjoyed. The end.

Comments (1)

Fankhauser knows cheese!

I recently was turned on to David Fankhauser’s excellent cheese page. Mr. Fankhauser is a professor of Biology and Chemistry at the University of Cincinatti Clermont College. He has really dug into the science of cheesemaking and created a great resource for home cheesemakers. Check it out!

Comments off

Rogue Creamery in Central Point, Oregon

Creamery Signage

Thom and I did a weekend trip down to Southern Oregon, and stopped at the Rogue Creamery in Central Point. The Creamery has been making cheeses since the 1930s and is now very well-known for its blue cheeses, especially the Rogue River Blue which has won a number of awards and is wrapped in grape leaves and aged for 1 year.

Central Point is a small town in the Rogue River Valley in a part of Oregon that is generally sunnier and warmer than where we live in Portland. Along the Rogue River Valley Highway, also known as Highway 99 and known in Central Point as Front Street, is a very unassuming concrete building which houses the Creamery cheese shop and part of their manufacturing facility.

The Rogue Creamery

The cozy little cheese shop has samples of all their signature cheeses. I tried several of their cheddars, a few of their blues and also some of their flavored cheddars including lavendar, garlic and chocolate stout. I was really taken with that last one and we picked up some of that.

Rogue Creamery Cheesecase

They also have a cheese case with cheeses from around the region and the very knowledgeable and friendly cheese ladies gave us samples of anything we wanted. From the cheese case we ended up selecting PondHopper, a cheese from Tumalo Farms in Bend which is a hard, aged goat cheese, unique for the hops that are added while steeping the curds. We also picked up Truffle Tremor from Cypress Grove, another goat cheese (I have a problem) — creamy and infused with the taste of truffles.

In looking at all the cheeses, chatting with the ladies, choosing some pear wine and some crackers and debating the merits of purchasing an insulated bag (we did), we totally forgot to swing back around and pick up some butter!

Butter!

Doesn’t that look like the most wonderful butter in the whole world? I guess we’ll have to go back.

Check out a few more photos of the cheese shop on my flickr. You will find Rogue Creamery cheeses in reputable cheese shops all over Oregon, at Whole Foods, New Seasons, etc. and on their website which also has some great photos of their cheesemaking process.

Comments (5)

More goat adventures: Goat Milk Gelato!

I almost forgot! In addition to the chevre and the fromage and the goat cheese and beer tasting, we also sampled some goat milk gelato (because I really don’t know when to stop). My mother-in-law got me the ice-cream maker attachment for the KitchenAid, which she also got me as a wedding gift way back. We share a love of delicious desserts!

I pasteurized the fresh goat’s milk and then followed this recipe from Alexandra’s Kitchen. I wish I had doubled the recipe because, unsurprisingly, 2 cups of goats milk makes about 2 cups of gelato. Though, if I had doubled that would have been 14 eggs! And, truly, the gelato was so rich and delicious and yummers that it’s probably a good thing we were limited.

The goat flavor in this was very subtle, overpowered by the rosemary, but the taste of rosemary in such a creamy concoction was really just over the top delicious, in my opinion. I love Alexandra’s beautiful plating of her gelato — after we did the beer/cheese tasting we all just grabbed spoons and dug in. This is the only photo we shot of it, almost gone:

Comments (1)

Cheese & Beer Pairing

Inspired by the New York Times article I wrote about previously, I started looking for some recommendations for cheese and beer pairings. We like beer near as much as we like cheese so it seemed only natural to put these two together. I came across a recommendation to pair summer beers like a wheat or hefeweizen with fresh young cheeses like chevre or fromage blanc. Since we had just made a batch of chevre that morning, I thought this would be perfect. Thom, my incredibly smart and handsome husband, who also happens to be a homebrewer and writer over at the BSBrewing Blog, came along to help me choose the beers.

Read the rest of this entry »

Comments (5)

Project 3: Making Chevre

For our third cheesemaking project, we wanted to make some goat cheeses. I had ordered the goat cheese kit from New England Cheesemaking Supply which came with four cheese molds, liquid rennet, chevre starter, fresh cheese starter, a yard of butter muslin and a recipe booklet. The first, easiest, recipe to make is the chevre.

The recipe booklet


We had gone out in the early morning and picked up the goats milk. We did a taste test of the fresh, unpasteurized goat milk and the milk was surprisingly light and not very “goaty” — it tasted almost like skim milk. As it was fresh it needed to first be pasteurized. For pasteurization, you need to keep the milk at 145 degrees for thirty minutes. Easier said than done. I think I need a better thermometer. It was pretty difficult to keep the milk at a constant temperature on my electric range.

After pasteurization, the recipe is very simple — add the chevre starter (a powder which comes in a little packet) and then you just have to wait. First the cheese needs to sit, uncovered and undisturbed for 12-20 hours or until firm and then you need to let it drain for another 6-12 hours. I let it set for about 9 hours until it kind of had a jello-like consistency. Since we wanted to eat it the next day, I needed to get it draining overnight. Next time, I’ll let it set for longer.

I was really surprised that the mixture had not separated into curds and whey but instead was still very mixed together. After making so many batches of mozzarella, I was just expecting something else. Here, I’m scooping the set chevre with my trusty “spoodle”:

Scooping the curds

I then let it hang for about 12 hours and the result was a very creamy cheese with that wonderful chevre aroma. It was quite bland just tasting it out of the bag but with the addition of cheese salt and, later, herbs, it really came out quite divine.


Fresh Chevre!

. . .

Sarah is going to write about our experience getting the goat milk and Nicole is going to do a writeup of the cheese we made with the group the next day. I also did a cheese and beer pairing with various goat cheeses including the fresh chevre we just made and I will write more about that.

Comments (2)

NYTimes article on beer and food pairing

This article from a couple years ago talks about how effective it can be to pair beer with food. The writer interviews Brooklyn Brewery brewmaster Garrett Oliver who talks about pairing beer with some foods which may be difficult to pair with wine. He raises the interesting point that beer can really break up the food and act as a palate cleanser in a way that some wines cannot.

Here at FUCheese we are beer lovers as well so learning how beer might complement our favorite cheeses would be exceptional. For our third cheesemaking project we are planning to focus on goat milk and I’m going to try to put together a beer and cheese pairing. I will report the results!

Comments off

Project 2: Whey day, part 2

A continuation from part 1. Check out the accompanying Flickr set.

* * *

After the first batch of mozzarella was done, Jen and Sarah set to work making Italian Feather Bread (a Ricki Carroll recipe (this will be a common theme)) which uses some of the hot, fresh whey in the mix. The bread turned out really beautifully and was like a airy focaccia with a texture almost like cornbread. We decided that this must be the recipe for Lembas Bread. Yes, we are nerds.

After working up a sufficient amount of whey, we made the fresh whey ricotta from Carroll’s book. At one point in the recipe it calls for mesophilic starter which I had ordered but not prepared as I didn’t understand that I had to prepare it ahead of time (it came in a little packet). So, we left it out but I’m curious to try it with — it apparently has something to do with the flavor which I think would be a welcome addition.

We had enough whey for a double batch and made that much plus a little extra (with plenty left over for drinking). You need to let the ricotta hang and drain for quite some time. At this point, everyone was whey tired and ready to put their feet up for the evening. But! Wait! We have cannoli shells!

* * *

So, we extended the cheesemaking day to breakfast the next morning. I stuffed the cannoli with an ad-hoc mixture of ricotta, mascarpone, bittersweet chocolate, orange zest and powdered sugar. The whey drinks were something that no one was really that excited about. But, whey protein is really good for you. And, go check out the prices on whey protein powder in your local health foods section.

The whey had chilled overnight in the fridge and everyone took a sip. At first taste it just tastes sort of like very watery milk — no one was very excited about that. So, I crushed mint, added a tablespoon of simple syrup to each glass and poured the whey over ice and it was really quite refreshing. The sweetness of the syrup perfectly counter-balanced the slightly sour taste that is indicative of milk. I would totally drink that again.

After that, project 2 was done. Next up, goat cheese!

Comments off

« Previous Page« Previous entries « Previous Page · Next Page » Next entries »Next Page »